Measurements of ultrasonic bulk and guided wave propagation in additively manufactured cubes and plates obtained by ultrasonic pulse velocity analyzer and scanning laser vibrometry

Description
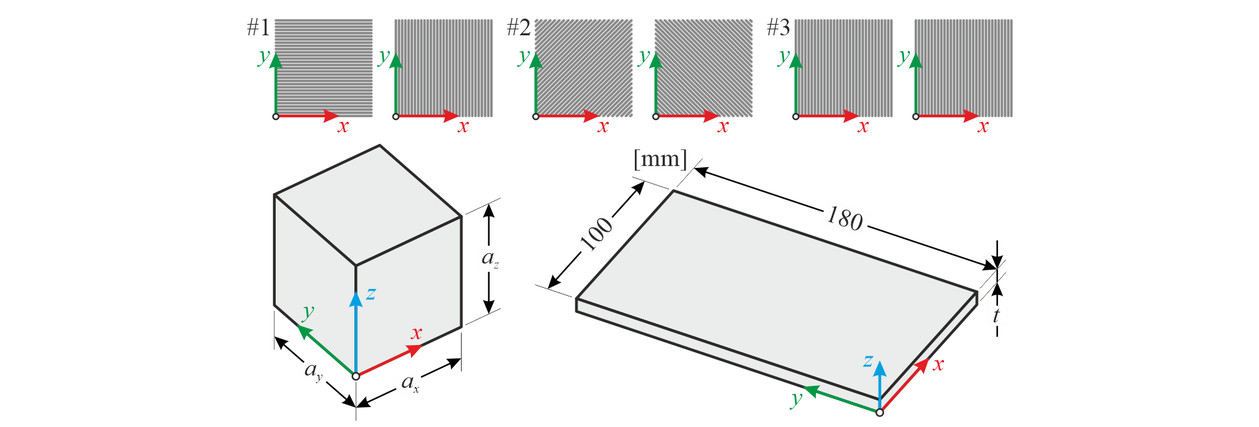
The DataSet contains the results of measurements of ultrasonic wave propagation in additively manufactured samples made of polylactic acid (PLA). Three types of raster angles in two consecutive layers were assumed: 0°/90° (#1), 45°/-45° (#2) and 90°/90° (#3) with respect to the x-axis. For each printing variants a cubic sample (#C1-3) with dimensions of 50x50x50 mm and plate sample (#P1-3) with dimensions of 180x100x3 mm were manufactured.

The measurements of ultrasonic bulk wave velocities were conducted with the ultrasonic pulse velocity tester Pundit PL-200 (Proceq) using the through transmission technique. For the P-wave measurements standard single-crystal probes with a diameter of 49.7 mm emitting a wave with a central frequency of 54 kHz were used. In the case of S-wave measurements, dry-point contact probes with 5 dual-crystal transducers with a central frequency of 40 kHz were chosen, where the distance between the two furthest transducers was 47 mm.
The time of flight (TOF) of the P-wave was measured along each of the three axes (x, y, z) by placing the probes on each pair of faces of the tested cubes (y-z, x-z, x-y, respectively). Three independent measurements were made on each face. The measurements of S-wave propagation were carried out at each sample face i-j (along axis k) for two orientations of probes, generating two shear waves independently, i.e., in the i-k plane and in the j-k plane (i, j, k = [x, y, z], i≠j, i≠k, j≠k). The TOF of each S-wave was determined four times.
The results for samples #C1 to #C3 are given in (.csv) files, separately for P-wave and S-wave measurements. The file with P-wave TOFs consists of 6 columns. In the consecutive columns, the following data are containted: sample name (1st), direction of P-wave propagation (2nd), path length (3rd), and TOFs of P-wave, in microseconds (4th to 6th). The file with S-wave TOFs consists of 8 columns. In the consecutive columns, the following data are containted: sample name (1st), direction of S-wave propagation (2nd), direction of S-wave particle motion (3nd), path length (4th), and TOFs of S-wave, in microseconds (5th to 8th). The TOFs of S-wave propagating along x axis in sample #C3 were not determined due to the low quality of signals.

The measurements of guided waves were performed by the scanning laser Doppler vibrometry using the laser vibrometer PSV-3D-400-M (Polytec GmbH) equipped with a VD-07 velocity decoder. The waves were excited using the plate piezoelectric actuators NAC2024 (Noliac). The excitation was a single-cycle wave packet obtained by Hann windowing of a sinusoidal burst with a central frequency equal to: 50 kHz, 100 kHz, 150 kHz, 200 kHz, and 250 kHz (separatelty, in consecutive measurements). Two types of excitation were assumed: symmetric (actuator S) and antisymmetric (actuator A), resulting with 10 measurements for each sample. Guided wave signals were collected in 91 points distributed along a straight line with a length of 90 mm located on the top surface of the plate. Each plate (#P1-3) was tested using trace line A (along the y axis). Additionally, plate #P3 was tested using trace line B (along the x axis).
Wave propagation signals for samples #P1 to #P3 are given in (.csv) files. Filename contains sample name (P1, P2, P3), trace line (A, B), excitation type (A,S), and excitation frequency (50, 100, 150, 200, and 250 kHz). Each file consists of 92 columns. In the 1st column, time vector (in s) is given. In columns from 2nd to 92nd wave time histories (in m/s) measured in 91 points are contained.
Dataset file
hexmd5(md5(part1)+md5(part2)+...)-{parts_count} where a single part of the file is 512 MB in size.Example script for calculation:
https://github.com/antespi/s3md5
File details
- License:
-
open in new tab
CC BYAttribution
Details
- Year of publication:
- 2024
- Verification date:
- 2024-04-09
- Dataset language:
- English
- DOI:
- DOI ID 10.34808/2g2j-8902 open in new tab
- Funding:
- Verified by:
- Gdańsk University of Technology
Keywords
- ultrasonic waves
- guided wave propagation
- additive manufacturing
- dispersion curves
- effective elastic constants
Cite as
Authors
seen 211 times
