Opis

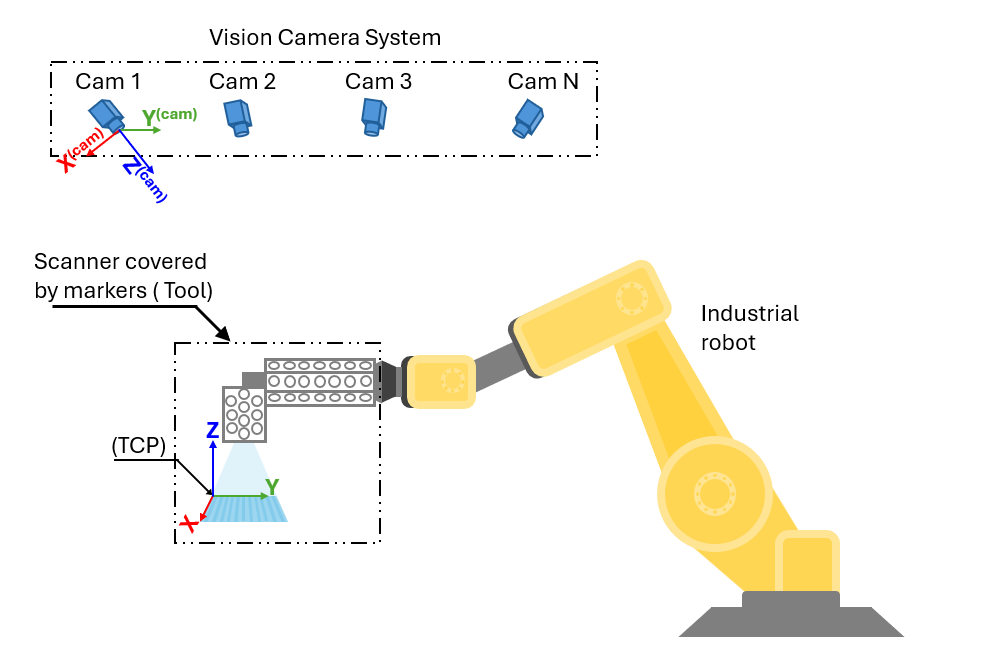
The dataset is a collection of images, 2D image points, and 3D points. It serves to calibrate a multi-camera robot system for high-precision measurements of large industrial components (more than 1m x 1m). In particular, the system uses a 3D scanner mounted on a robot manipulator and multiple cameras attached to an external frame outside of the robot work zone. To achieve a measurement resolution at the level of tens of micrometers, the 3D scanner was designed with a small working area of 100mm x 100mm. Consequently, to measure objects larger than the scanner's working space, a method for locating the moving scanner in 3D space was required. This approach enabled the stitching of measurements from multiple scanner positions, thereby reconstructing the complete geometry of large industrial components. For this purpose, the 3D scanner was covered with tailored markers to facilitate precise localization of the scanner within the multi-camera system. To this end, it is necessary to calibrate the cameras internally (internal calibration determining the optical parameters of the camera with the lens) and to calibrate the entire vision system externally (external calibration determining the position and rotation of the cameras relative to each other). Two calibration methods have been developed:
- Dot plate method – internal calibration
- Vision target and Laser Tracker method – external calibration
Moreover, another calibration method was developed that allowed for simultaneous external and internal calibration of the vision system:
- Single dot and CMM (Coordinate-Measuring Machine) method – internal and external calibration
Finally, to be able to use the information about the localized markers to determine the position and rotation of the 3D scanner with respect to the cameras coordinate system, tool calibration is also necessary. Tool calibration consists in finding the position of all markers on the scanner in its internal coordinate system. A method for tool calibration was developed, which consisted in scanning a rigidly mounted sphere in space from different rotations and positions of the scanner. Having information about the position of the scanner relative to the sphere and the position of the markers, we are able to determine scanner’s motion in 3D space for stitching all measurements of the industrial object.
Acknowledgments: This dataset was developed as part of the project titled "Development of an optical technology for spatial positioning and navigation in measurement applications for industry based on the positioning of passive markers in visible light" (grant agreement no. POIR.01.01.01-00-D004/16-00) funded by the National Centre for Research and Development, Poland.
Plik z danymi badawczymi
hexmd5(md5(part1)+md5(part2)+...)-{parts_count} gdzie pojedyncza część pliku jest wielkości 512 MBPrzykładowy skrypt do wyliczenia:
https://github.com/antespi/s3md5
Informacje szczegółowe o pliku
- Licencja:
-
otwiera się w nowej karcie
CC BY-NCUżycie niekomercyjne
Informacje szczegółowe
- Rok publikacji:
- 2025
- Data zatwierdzenia:
- 2025-01-17
- Język danych badawczych:
- angielski
- DOI:
- Identyfikator DOI 10.34808/mt8k-by32 otwiera się w nowej karcie
- Weryfikacja:
- Politechnika Gdańska
Słowa kluczowe
- automation
- robot
- manipulator
- hand-eye
- calibration
- quality control
- computer vision
- metrology
- precision
- micrometers
Cytuj jako
Autorzy
wyświetlono 95 razy

